


From Grogu to Wonder Woman, Here’s How To Start Your Own Fandom Embroidery Projects
Trust me, anyone can do it.
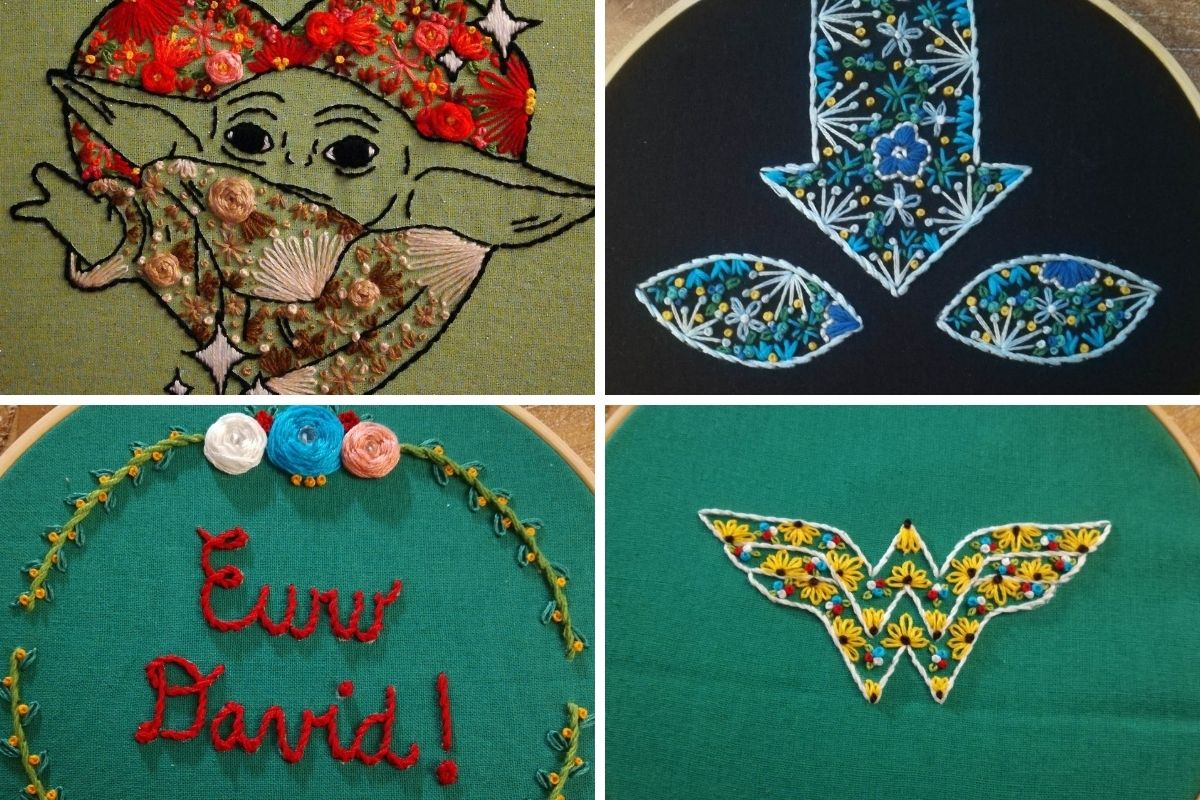
Self-care comes in all shapes and sizes. For me, what’s kept a part of me grounded during this quarantine and pandemic, is the things that I can create with my own two hands. Yes, I paint, draw, and do origami. But my true passion and what’s kept these hands busy is embroidery. Correction, fandom embroidery. From The Mandalorian‘s Grogu to Wonder Woman‘s logo, Schitt’s Creek “Eww David,” and Avatar: The Last Airbender‘s avatar state. I’ve made them all and so can you.
I know it’s a little intimidating, and it seems like a lot. But anyone can do fandom embroidery. All you need is inspiration, the supplies, and someone to hold your hand and give you all the tips to get started. That’s where I come in. Below I’ve included the supplies you’d need to start your own embroidery projects, tips explaining what methods I use most, and videos to accompany you and show you the ropes.
Step One – Buying what you need
To start your own embroidery project you’re going to need the following:
- Embroidery hoop – These can be purchased in all sorts of sizes and in many materials via craft store or Amazon. Personally, I use bamboo hoops because of their versatility. Here’s a variety pack with different sizes you can try.
- Embroidery scissors – It’s the dealer’s choice on what kind of embroidery scissors you want. Amazon has a great number of choices but here are my favorites.
- Fabric – Your local Michael’s or Joann’s Fabrics will have a plethora of fabrics for you to choose from. Personally, I go for the Fat Quarters fabric samples because they’re on sale a lot and you get to experiment with a lot of different colors and patterns. Don’t have a local store? Etsy is a good place to start your fabric hunt.
- Embroidery floss – Same thing as the fabric. Hit up your local Michael’s or Joann’s Fabrics. Don’t have a local store? Etsy is a good place to find all the embroidery floss.
- Embroidery needles – Same thing as the fabric and embroidery floss. Hit up your local Michael’s or Joann’s Fabrics. Don’t have a local store? Amazon has some here.
Additional things that you might need:
- Needle pin cushion – This will save you many instances of the needle rolling around, falling, or getting lost while you panic over where it’s hiding.
- White water-soluble pen – This pen will work well on dark fabrics when you’re trying to mark things or if you want to draw a pattern on said fabric. Use water to erase.
- Heat soluble black pen – This pen is a godsend when working with fabrics. It allows you to mark, draw, and do whatever your heart desires. To erase it you just have to apply heat. I use a blowdryer and it’s perfect.
- Water-soluble printer paper and printer – These are perfect for printing designs.
- Felt – This will be used to cover the back of the embroidery if you choose to do so. For best results, buy felt that matches the color of your embroidery fabric.
Step Two – Pick a design
Go wild. Seriously. There are plenty of free designs on the DMC website and Etsy has plenty of printable designs. Those don’t float your boat and you don’t have a printer or water-soluble paper to print your designs on? Use the white water-soluble pen on dark fabrics and the heat-soluble black pen on lighter fabrics to draw your own designs.
Scratching your head on how to do it? Check out the video below:
Step Three – Learn how to set up an embroidery hoop
After you’ve got your design set, it’s time to pop on the hoop to do the actual embroidery. Make sure to use the smaller hoop to gauge where your design is going to be. Slip it under the piece of fabric, center the design, and place the larger hoop on top. Cut the fabric in a square shape, making sure there are at least two fingers’ width around the entire hoop.
Still confused on how to do it? Check out the video below:
Step Four – Learn how to separate your floss
After you’ve set up your hoop, it’s time to pick out your colors and separate your embroidery floss. Embroidery floss has six strands that are twisted together. You want to separate the embroidery floss so you’re working with three strands. Why is this important? It allows for clean lines and an easier time moving in and out of the fabric as you make your design.
Need more help on how to do it? Check out the video below:
Step Five – Learn a couple of stitches
The key to learning stitches is to go slow. Don’t throw yourself in the deep end. Learn one basic stitch at a time. As soon as you master one, move onto the other one. Doesn’t matter if you have to rewatch the video, which will likely be on Youtube because all the best examples are on there. Watch it again, master it, and when you get stuck, see if there’s another method to achieve the stitch or if someone explains it the way you can understand it. There’s no one way.
Below I’ve included some essential videos that I use until this day when I need a refresher on the running stitch, french knots, and more! And remember, be easy on yourself and conquer one at a time. If not, how are you going to accurately capture Baby Yoda’s face? Or Aang’s Avatar state? Also, I’ve included some easy beginner flower and leave embroidery stitches for once you master the beginner stitches.
Step Six- Decide what style you want for the back of the completed hoop
Now that you’ve completed your design, you have to decide how you’re going to finish it off. You still have all this extra fabric around the edges and if you flip the hoop over you can see all the behind-the-scenes of your hard work. After cutting off the excess fabric, making sure to leave at least an inch or two of fabric to work with, I love to complete my work with a backing of felt that covers up the back of your hoop.
Tips:
- You’ll get to practice your whip stitch and blanket stitch here.
- But there are other ways that you can back your embroidery and here are a couple of examples for you if the method below isn’t what you want.
- To cut a perfect circle of felt lay down a completed hoop on felt. Use a marker/pen of your choice to make a line on felt and around the hoop. Cut inside those lines to make it line up with the back of the completed hoop.
- Use this opportunity to include a design or signature on the felt of your choice to mark your work.
Step Seven – Enjoy your hard work
You’ve put in the time and done all the hard work. Now it’s time to enjoy, share, and marvel at your work and plan what’s next. Because there’s always another project on the horizon!
Still have questions? Hit me up on Twitter or email me at: [email protected].
(image: Lyra Hale embroidery)
Want more stories like this? Become a subscriber and support the site!
—The Mary Sue has a strict comment policy that forbids, but is not limited to, personal insults toward anyone, hate speech, and trolling. The Mary Sue may earn an affiliate commission on some products and services purchased through links.—
Have a tip we should know? [email protected]